Bi-amp / Active Crossover using Gainclone

31/12/07 - Final setup using 4 LM3875 gainclones to drive a pair of two-ways speaker -- that's one amp per driver! It sounds so transparent like glass.


30/12/07 - Managed to cram 4 channels of 3875 amps into this little box. It's a two-tier setup. The whole system now sounds really great but I'm having problems with hum on the second pair of amp (pulling hair...). Also I don't know why the new pair runs hotter even though they are exact same design.


28/12/07 - Completed active crossover setup. Now I need a second pair of gainclones to make sure all frequency matched!


The active crossover is based on Rod Elliot design 'P09' with cutover freq. of 3.5kHz. Calculated C=39nF, R=820R

Foobar2000 + ASIO how-to

To bypass Windows/OS signal processing use ASIO with Foobar. First install 'asio4all' (http://www.asio4all.com) then from 'asio4all offline setting' activate the sound device e.g. USB DAC.

Install Foobar ASIO plugin (http://www.foobar2000.org/components/index.html) by copying the. dll in foobar directory. Then from Foobar go to preferences > playback > output > asio virtual device .. create ASIO4ALL as new device.

Once the device is created go back to 'output' then select ASIO: ASIO4ALL as the output device.

Note:
ASIO4ALL does not resample (it is why we want to use it after all), so for playing 24bit recording on 16bit DAC go to Foobar2000's DSP and activate resampler (PPHS) with 16 bit target sampling rate.

Dared MP-5: Connecting to Ubuntu Linux

Dared MP5 is using a generic TI/Burr-Brown PCM2702E DAC chip which is supported by Ubuntu Linux.


Simply plug in the USB and go to System > Preferences > Sound. Select 'USB Audio' in 'Sound Events' and 'Music and Movies' and click 'Test'. A test tone should confirm that it's working.

There is a catch. Although tests are ok, Ubuntu players (VLC, Totem, etc.) keeps using the PC loudspeaker instead of USB Audio. To fix this the following steps can be performed to set the default sound device:

  1. Open Terminal from Applications > Accessories

  2. run the command 'sudo asoundconf list', you need to enter admin password. On my IBMT23 I got back:

    Names of available sound cards:
    I82801CAICH3
    PCM2702

  3. Then run 'sudo asoundconf set-default-card PCM2702' followed by a reboot to test.

The same procedures can be used for other Ubuntu/Linux compatible DAC such as SoundBlaster Live!

http://youtube.com/watch?v=pm04EJdLOeg

Dipole / open baffle speakers

Just when I was wrapping up my project, I mounted 10" woofer onto a piece of panel, and never looked back. A day later I completed a pair of dipole speakers (open baffle) using only pairs of very cheap speakers I found on the side of the road.... and it sings the most beautiful notes.


There is no 'box' feeling. Just instruments and air that "breathes". There is an inherent low-frequency tradeoff as it is not as loud, but when it does get there -- what a bass! I love it so much I don't know what's next for improvement.


Perhaps it is time to finally .... listen.

http://youtube.com/watch?v=StnJpUfQcZc

8/1/08 - Fixed crossover calculation:
cutover freq 2500Hz
woofer imp. 8 ohms, L stays 0.5mH,
tweeter imp. 4 ohms (2x parallel 8 ohms), C changed from 3.3uF, then 2x3.3uF, then to 15uF but later back to 10uF in parallel (sounds better)

Jensen SPX-7 review and modifications

The Jensen SPX-7 speakers are impressively well built and braced. Each uses two 6" speakers and a 25mm softdome tweeters. The drivers looks and feels rigid and cosmetically beautiful. Although bearing a US name, these Jensens are assembled in Australia.


Upon connecting the speakers to my gainclone amps, I found the sonics are nice. The crossovers are then upgraded using Mundorf M-Cap Audiophiler capacitors with similiar 3.3uF value.


The Mundorf capacitors contributes in very transparent mids and highs.


Dared MP-5: Review and modification

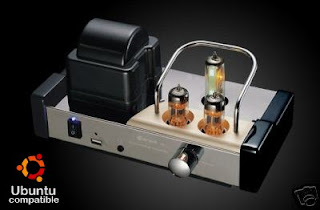
Also known as the Fatman iTube.

After listening to the Dared MP-5 tubed integrated pre-amp, I decided that I want to make a "pre-amp out". This is useful if I want to connect to a different amplifier, while wanting to use the tube section.

So I needed to tap the DAC + Tubed preamp stage of the Dared MP-5 as it does not have RCA out. Flipped the amp upside down and removed 4 screws to get access to the board, I noticed that the Dared MP-5 is using STI TDA7265 chip power amp.

Reading the datasheet from I found out that pin # 7 and #11 are the inputs, so this is where I want to tap the signal. Looking at the PCB they are clearly marked as L, R, and GND. Thanks to the PCB designer!


Update 25/5/09:
After living with the amp for quite a long time I have come to the conclusion that it is a very good amplifier which requires no modification/addition. I am using it now to power a pair of fullrange TangBand speakers.

Update 25/4/2015
The potentiometer used in Dared MP-5 is rather cheap one. After a few years it developed oxidation and audibly noisy. It can be easily accessed and changed using better ones like Alps etc. Smaller pots can be soldered from underneath the PCB patch.


Dared MP-5: unpacking

During my search for a proper DAC for my gainclone I stumbled upon the Dared MP-5. It is very unique in the way that it combines USB DAC, tube pre-amp, and a (supposedly) gainclone implementation. The DAC is an older version which is 48khz so it won't be able to decode SACD or any 96khz recording. The amp is also a 13w/ch version as supposed to 50 or 60 watt LM3875 gainclones. Nevertheless the tube preamp is really appealing and even without RCA out I think I can simply tap the potentiometer to create one.

The Dared MP-5 came delivered in a quite big box. I did not expect that and it was a good sign.


It came with literally everything needed to make music. Just plug in a PC and Speakers. It also came with a white cotton gloves and brush, and you'll soon know why ...

This amp is like a piece of jewellery. Fully polished and shiny I opt to lift it from the bottom to move it around. It is also bigger than I expected and is very solid.


At the front there is a power button with blue led indicator, usb port with indicator, a volume control, and a headphone jack. At the back there are RCA line-in, switch to select usb/RCA input, and speaker connectors. The tubes are protected using a flat-black cage and it looks fine. I see people take it off but I just don't bother with it.

Gainclone sound & review

I run the Gainclone using a pair of Jensen SPX-7 speakers bought second-hand from eBay which are (surprisingly) very well built. Temporary source currently either my IBM Thinkpad X31 (WinXP) or my IBM T23 (Ubuntu) but a proper tubed-DAC is on the way.


The Gainclone is a very nice, musical-sounding amps. I needed to run it in for about 48 hours and then it is simply is very hard to fault. Very detailed and fast -- from high to lowest frequencies, it reveals many sounds I did not notice before. It is a very musical amp and makes listening very relaxed and enjoyable.

I enjoy a wide range of music using this amp, from the clarity of piano and tenor voice of Christian Willisohn in Hold on I'm waiting for you ... to Metallica's Lars Ulrich snare drums in Holier than thou.

The Gainclone delivers big time!

Gainclone built progress

I decided I won't spend $300 for casing but if you search the term 'Gainclone' in Google images there are heaps of excellent design samples. Mine uses Jaycar $15 casing which looks nice and tidy for its price.


The toroid and amps circuit fit perfectly.


30/12/07 - Managed to cram 4 channels of 3875 amps into this little box. It's a two-tier setup. The whole system now sounds really great but I'm having problems with hum on the second pair of amp (pulling hair...). Also I don't know why the new pair runs hotter even though they are exact same design.


7/1/08 - Upgraded the pots using two 100k ohms linear ALPS blue velvets. Result is not much difference.

Gainclone assembly & testing

I decided to put both 2 channels and their power supply circuits into one board. This will shorten all signal length.


The wiring is point-to-point. I forgot to take the picture underneath but it is quite tidy due to very simple design. The feedback resistors were directly soldered onto the chip's pins for the shortest distance possible.


The assembly took me the whole night but it was straightforward. I plugged in the power and after looking cautiously for smoke I plugged in the speakers and it made a nice sound. There was a problem though.


The Gainclone would make beautiful sound but after 30-40 seconds it would get into some kind of oscillation problem. The sound was like bbrbbbbrbb ... after some thoughts and investigation I pointed out grounding as the culprit. It was using one transformer with two 0-30 outputs. I changed the wiring as shown here and the problem was fixed.

Gainclone design

Simplest and best-sounding DIY amp, based on LM3875 amp. This part list is based on Australian pricing.


The topology is drawn by Mark Houston (diyaudioprojects.com). Many great sample builds there.


A simple, unregulated power supply.